Tutorial - Handmade paper Peace Rose
IF LIKE ME, YOU PREFER TO WATCH VIDEO TUTORIALS, I HAVE DONE ONE FOR THIS FLOWER. PLEASE SEE THE LINK BELOW THIS PHOTO OR CLICK HERE
TUTORIAL - THE PEACE ROSE
IF YOU PREFER THE VIDEO TUTORIAL, PLEASE CLICK HERE
Good morning folks......IT CHRISTMAS EVE!!!!!!!! AHHHHHHHHH!!! SANTA IS COMING! Don't you just love Christmas? And once the big day comes and you've torn open your presents, set up the kids new toys and added batteries into everything, eaten until you have to undo the top button of your trousers and you proclaim "I will never eat like that again" even though you cant help but nibble at the left over turkey every time you walk passed it.....you'll think to yourself "Ack well, all the stress, expense and hassle was worth it", lol. I love Christmas, I cant wait to sit around the table with all 18 of us (this year is a light year!!).
Anyway, enough of my waffling ("As if" I hear you cry!), I promised I would do the tutorial of this rose. I did say it would be done after Christmas, but what they hey. I may as well stick it up now. I've decided to call it the Peace Rose as the very lovely and talented Ruth, and of course not forgetting to mention she is a fellow Northern Irelander....Wooowhoooo! (
a passion for cards) told me it looked like the Peace Rose her Daddy used to grow so I thought that was a very fitting name. So I have named it the Peace Rose......providing Ruth doesn't mind of course?!
Right....on to the tutorial. Honestly, its pretty much the same as my wee roses tutorial, Im just using a different flower.
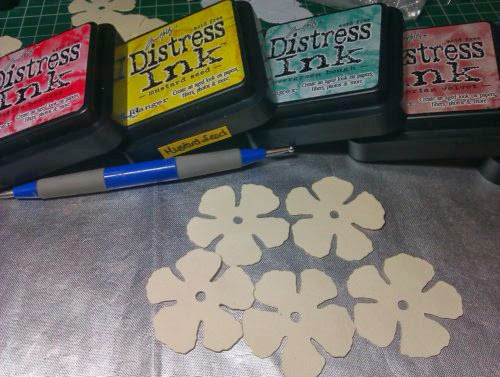 |
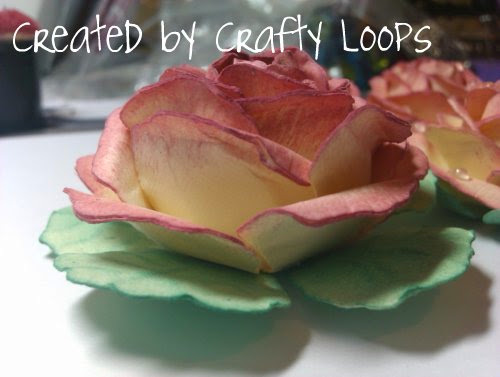
| I die cut 5 flowers from the Spellbinders Rose Creations Dies. This is the middle sized flower. You also need a large embossing tool (or rounded pen end), hot glue (much better than wet glue in my opinion), cardstock (I used 300gsm cream linen cardstock....Ive just used the end of it, I need to find more!), Distress inks to colour the petals, glossy accents if you want to add "raindrops" to your petals. |
 |
| Using Victorian Velvet Distress inks I went around the edges and slightly into the petals on both sides of each flower. |
 |
| Use a large embossing tool or if you unfortunately don't have a large embossing tool, like me, use the rounded end of a pen and emboss the flower petals in a circular motion. This breaks the fibres in the papers and makes them easier to manipulate into shape. |
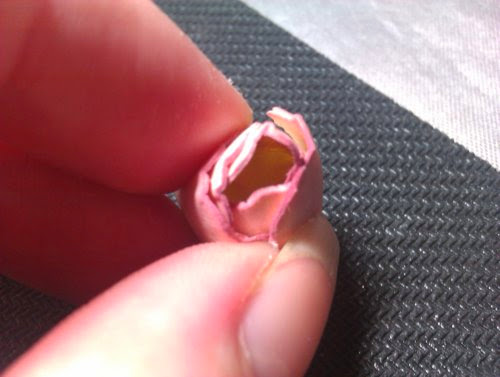 |
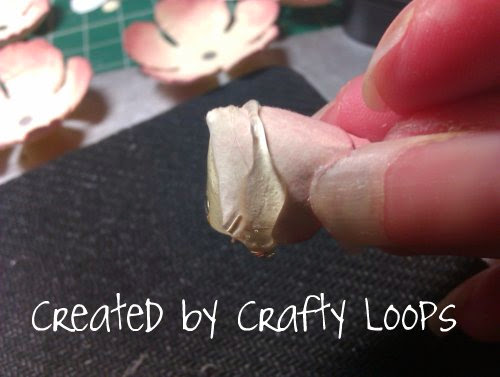
| Take one flower and work it into a rose bud shape. |
 |
| Once you are happy with how your bud will look, open up the bud again and use hot glue on each of the petals, paying particular attention to the edges of the petals. I put the glue near the middle so none of the glue will show anywhere near the top of the bud. |
 |
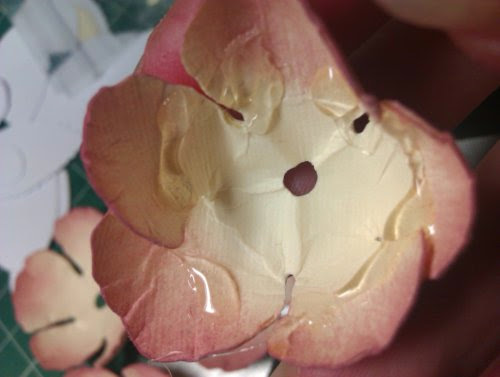
| (Please excuse my gluey mat!) As hot glue dries quickly, you need to be quick and work your flower back into the rose bud shape. It wont be hard to do as you had previously worked it into shape. |
 |
| Take your rose bud, put a dollop of hot glue on the underside of the bud and a circle of glue half way up the bud. |
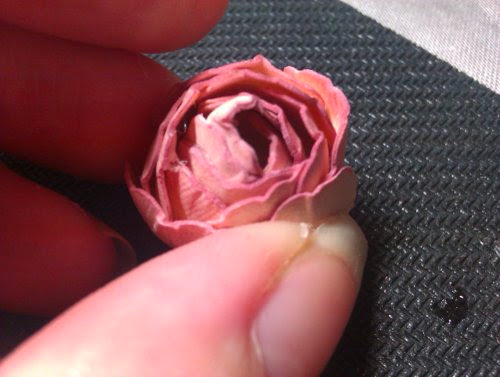 |
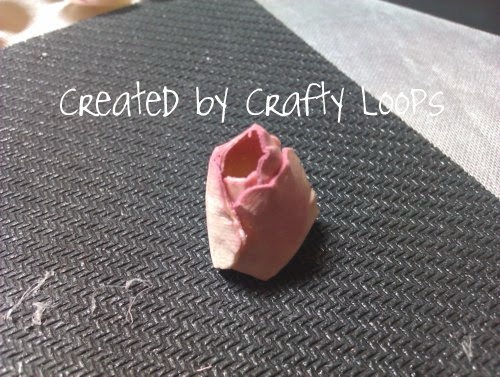
| Place the bud into the centre of the next flower and mould the next flower around the rose bud. Try and off set the petals as you place each layer on top of each other. |
 |
| With your next layer, again place glue on the underside of the layer you've just made but this time put a ring of glue just below half way up the flower. |
 |
| Again place the flower into the next layer and mould it around the forming flower. You will see that because you havent put the glue half way up this time that these petals flair out a bit more. This is completely correct. |
 |
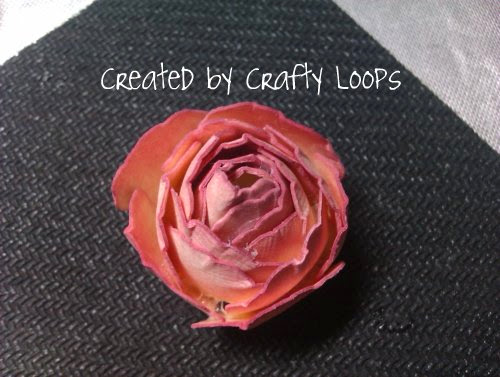
| For the next 2 layers do exactly the same, but again place a dollop of glue to the underside and for the last 2 layers simply place a circle of glue around the sides of the bottom of the flower and again mould each layer to the one above it. Again making sure you off set the petals. |
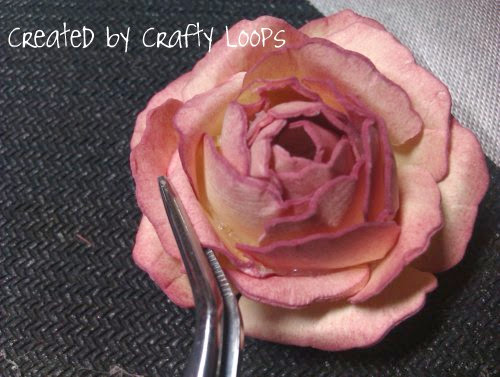 |
| Once all 5 layers are glued on top of one another, your flower will look like this. You then need to go around the flower, curling down the outer flower petals to give your rose its beautiful form. I just use my tweezers and curl the edges around them. |
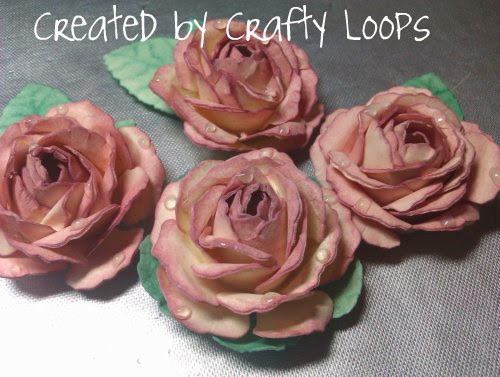 |
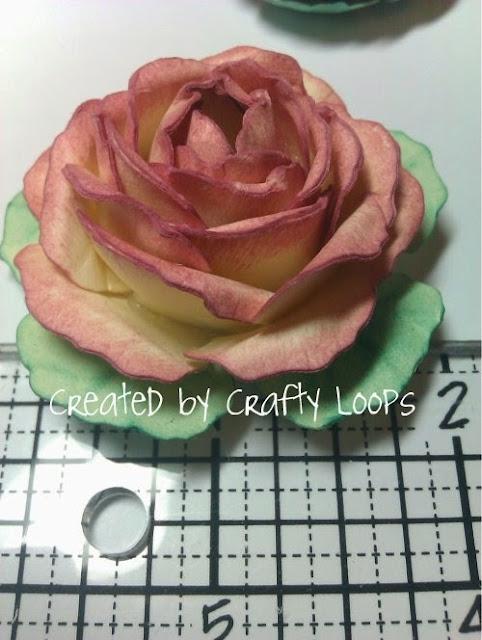
| And that it folks....simple as. I added some glossy accents on the petals to look like raindrops. |
 |
| On this flower I used the leaves from the die and I embossed my own leaf veins onto them to make them look more realistic. I just used my thin tip embossing tool to do this. |
 |
| Side view of the roses |
 |
| The top rose is using the next sized die up from the smaller flower |
 |
| Comparison in size between the small and bigger rose |
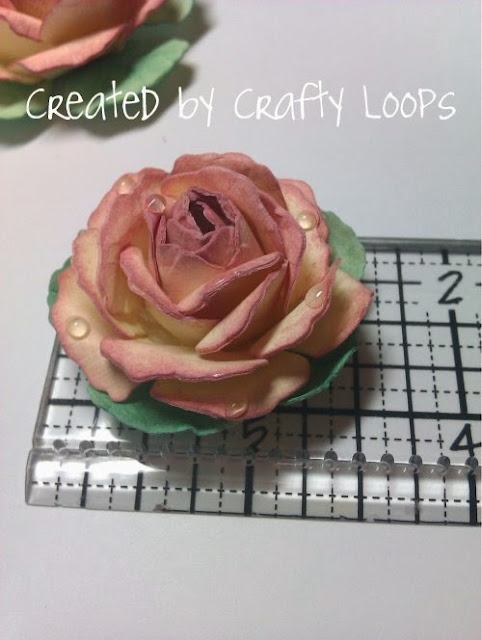 |
| At its very widest the small rose is 1.5inches |
 |
| At its widest, the larger rose is almost 2 inches |
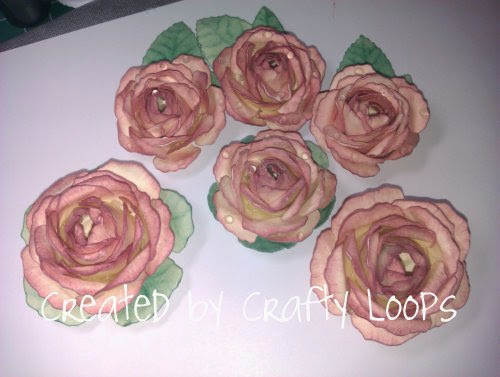 |
| Here they are all together, big and small |
 |
| Profile of larger flower |
And there we have it, my tutorial for my Peace Roses. See it actually is really simple. As always, any questions please comment below or contact me through my email above.
I just want to take this opportunity to wish everyone a Wonderful and Happy Christmas for tomorrow and the rest of the Christmas Season. Its my 6 months Blogaversary tomorrow! Yeah! And on that note, if you haven't seen my Blog Candy and you are one of the 301 followers I had, please scroll down to enter. Hope everyone has a safe and happy time this Christmas and that 2012 will bring much fun, laughter and fantastically crafty adventures.
Big hugs to you all. Toodles Noodles....Loops xx
If you want, you can buy me a
coffee which helps me maintain this blog so I can make bigger and better content, simply click on the image or copy the link below. No pressure at all, its just if you want to. Cheers big ears!
https://ko-fi.com/craftyloops


Hi Lee
ReplyDeleteGorgeous and beautiful roses and fab tutorial
Wishing you and your family A Merry Chrsitmas and all the best for 2012,have a fabby time
Hugs Dianne xx :)
WOW, so gorjuss, you make it look so easy, but am sure i will have a few landing up in the bin first,lol, but absolutely love this!!! Real fitting name..........:))
ReplyDeleteHave a Blessed Christmas with family and friends!!
lotsa luv
Hi Loops,
ReplyDeleteJust found your wonderful blog, through a few mutual blogging pals, and Wow!! What a wonderful blog you have too, I love it!
I adore your flowers, clever you! Thank you so much for sharing.
Have now become a follower, so look forward to seeing more.
Hope you have a wonderful Christmas.
Suzie xxx :)
wow another lovely flower lee ... hope you have a wonderful christmas lots of love sandy xx
ReplyDeleteВеликолепные розы ! восторг !!
ReplyDeleteAnother gorgeous flower Lee, you make it look so easy. Have a smashing Christmas, 18 wow!! Debs xx
ReplyDeleteSTUNNING!!!!!!!!! A fabulous tutorial, thank you so much and Merry Christmas to you too.
ReplyDeleteSue (bearhouse on DC)
Hi Lee,
ReplyDeleteThankyou so much for your lovely comment on my blog! I have been following you and your beautiful creations and this is a wonderful tutorial Lee..I have this die and I never realised you could make something like this from it. I will get my hot melt glue out now! They are gorgeous. You are a real inspiration - Happy Christmas, Hugs, Teresa x
Hi Lee, these are absolutely fantastic!!! They look amazing with the raindrops! Thanks so much for the tutorial.
ReplyDeleteI'm so touched that you called them Peace roses! I've just been sitting thinking about how much I miss my dad especially at this time of years (even though he passed away when I was 12) so your post has just brought tears to my eyes.
I hope you and your family have the lovliest Christmas ever!! And a very Happy New Year. I'm just setting off to join the last-minute shoppers in Belfast......it may be some time before I return!
Ruth x
Oh wow Lee, these are gorgeous flowers and what a fab tutorial! You make it look so easy. I always end up with glue and ink all over me when making flowers, and they never turn out as good as yours. This one looks SO real! Have a great Christmas. 18 for dinner!!! Woah, someone is going to be busy tomorrow :-) Love Maddy x
ReplyDeleteSo beautiful Lee..... thank you so much for this tutorial! I can't wait to have a go!
ReplyDeleteHappy Christmas to you and yours, and thanks for your blogging companionship over the last few months...
Big Hugs
Christine x
Hi Lee, so pleased to meet you! My friend Teresa from My Crafty Heart introduced your blog to me and boy am I glad she did! You have a new follower now ;-) Your tutorials are amazing, those flowers are over the top gorgeous! Thanks for sharing. Merry Christmas to you and your loved ones, all the best from the Netherlands, Ira
ReplyDeleteAbsolutely gorgeous, love the raindrops on them, just stunning Lee..Have a wonderful Christmas.
ReplyDeleteWendy xx
oh wow Lee, these are gorgeous! i love the dew drops on the petals. thanks for the lovely clear tutorial.
ReplyDeletesuzanne2
WOW! WOW! WOW! Just Stunning! Hope you have a totally lovely Christmas! Kim
ReplyDeleteFab tutorial, thanks for sharing. I wish you a very merry Christmas and a happy crafty new year
ReplyDeleteLindsay xx
absolutely stunning they look so real, Have a fantastic day tomorrow hope Santa brings you loads and a Happy new Year.
ReplyDeleteChris x
these are so beautiful lee.really stunning.thanks for sharing your tutorial and i wish you and yours a really fantastic christmas :D
ReplyDeletexx coops xx
This comment has been removed by the author.
ReplyDeleteMerry Christmas to you and all yours , honey! Fab flower and tutorial!
ReplyDeleteWow this is gorgeous Lee! Thank you for the tutorial.
ReplyDeleteMerry Christmas to you and your family
Hugs xx
Absolutely stunning roses. Thanks for a fabulous pictorial. Hope you had a Merry Christmas.
ReplyDeleteHappy New Year,
Georgiana
Carson's Creations
Lee: I can't believe how BEAUTIFUL your flowers are! They always turn out amazing, and these are SUPER. Thanks for sharing your techniques. It's always inspiring and I should give it a try. Thanks also for the Christmas wishes. We had a quiet Christmas at home (just the 5 of us). I missed my Mom a lot though. She is in Minnesota. I appreciate your thoughts. Glad you enjoyed your extended family. Chat with you soon!
ReplyDeleteKaren
These came out SO beautiful. You did a wonderful job with them. I LOVE the finished look :) Hope you're enjoying ing the holidays!
ReplyDeleteBeautiful roses Lee and very easy to follow tut, thanks for sharing it with us. Romayne xx (dc)
ReplyDeleteI love this flower, thank you.
ReplyDeleteOh Lee they are stunning, you always make such beautiful flowers.
ReplyDeleteI'm so pleased you are having a fab Crimbo, as for the chocolate there is always room for that no matter how stuffed lol
hugs Mandy xx
More beauties here I see! Hope you had a great Christmas, Jx
ReplyDeleteYou are a talented girly Lee, these are just beautiful! Hope you had a great Christmas, hugs,Karenxx
ReplyDeleteHi hunny, wow fab tutorial again hun, love your flowers they are all so beautiful,
ReplyDeletewishing you a very happy New Year, have lots of fun and good luck too, hugs Liz xx
Great tutorial , hope you had a lovely Christmas x
ReplyDeletestunning roses so much better than shop bought and great tutorial - must have a go
ReplyDeleteHugs Kate xx
Fantastyczne!!!!! Na pewno skorzystam, a już teraz dziękuję i życzę dobrego Nowego 2012 Roku!!!
ReplyDeleteBrilliant tutorial - beautiful roses, particularly love the raindrops and so simple to do too. Thanks for sharing. Elizabeth x
ReplyDeleteAnother fantastic tutorial lee, these are just gorgeous!
ReplyDeleteThese are absolutely STUNNING Lee! You are so talented! I keep trying to create paper flowers but they never quite turn out. Beautiful!!
ReplyDeleteSarah
Wow! The roses are gorgeous! I already have this die and will deffinitely try this! I'm following you now :)) Ani
ReplyDeleteWow I love these so much they are great
ReplyDeleteLove and Bugs xxxx
Lovely roses...I must try to create a flower like this by myself!
ReplyDeleteI am just loving this blog!!! i have come across this blog via coops cluttered corner and it is great, i can only do 1 flower and cannot wait to look at the rest of your tutorials, do you have a tutorial for using distress inks as your rose petals look so realistic, i dont seem to get the hang of distress inks!
ReplyDeleteHoly moly, you are good at those beautiful roses!
ReplyDeleteWow! I just found you via Brenda's link, and I am definitely going to be having a go at this! Stunning! It does look like a peace rose. We had one in the garden of our first house
ReplyDeleteBrenda sent me and I am glad she did. Great flowers and great tutorial
ReplyDeleteI followed the link from Brenda's blog to see your tutorial. Your roses are stunning. Thanks for the fab tutorial. Must definitely try this...
ReplyDeleteBeautiful rose, love the raindrops.
ReplyDeleteLove all your flower tutorials.
Thank you so much for sharing.
Wow! These are amazing, sooooo beautiful. I'll definitely have to get these dies and have a go but I know they won't turn out as stunning as these. Many thanks for the tutorial. Laney_jay xx
ReplyDeleteHi,
ReplyDeleteAmazing tutorial! Thanks for sharing! x
Fabulous tutorial!These roses are stunning!I found your blog when I was googling The Rose Creation die and have enjoyed visiting your blog.
ReplyDeleteAn amazing creation. I have tried so many times to make 'real' looking roses from spellbinders. You do it better than Donna Salazar who created the die. Brilliant work
ReplyDeleteEileen x